DOM과 HTML
[JS/브라우저] DOM 으로 HTML 조작하기
Goal
- DOM을 JavaScript로 조작하여 HTML Element를 추가 / 삭제 / 내용 변경
- createElement - CREATE
- querySelector, querySelectorAll - READ
- textContent, id, classList, setAttribute - UPDATE
- remove, removeChild,
innerHTML = “”,textContent = “”- DELETE - appendChild - APPEND
- innerHTML와 textContent의 차이
- DOM을 JavaScript로 조작하여 HTML Element를 추가 / 삭제 / 내용 변경
- createElement - CREATE
- querySelector, querySelectorAll - READ
CREATE -createElement
document 객체의 createElement 메소드를 이용하여 새로운 div element 만든다.
1 | document.createElement('div') |
자바스크립트의 어떤 작업 결과를 담으려면, 변수를 선언하고 작업의 결과를 변수에 할당한다. 여기서 div element를 변수 tweetDiv에 할당한다.
1 | const tweetDiv = document.createElement('div') |
⇒ 이렇게 생성된 tweetDiv라는 요소는 어디에 연결되지 않은 공중 부양중인 노드이다.

공중에 떠있는 엘리먼트를 확인하려면 ‘APPEND’ 한다.
APPEND - append, appendChild
tweetDiv 변수를 트리 구조와 연결하기 위해 append 라는 메소드를 사용해서 body에 넣는다.
1 | document.body.append(tweetDiv) |
READ - querySelector, querySelectorAll
자바스크립트에서 원시 자료형인 변수의 값을 조회하기 위해서는, 변수의 이름으로 직접 조회할 수 있다.
- 참조 자료형인 배열 ⇒ index
- 객체 ⇒ key
BUT, DOM으로 HTML 엘리먼트의 정보를 조외하기 위해서 querySelectior의 첫 번째 인자로 셀렉터(Selectior)를 전달하여 확인할 수 있다. 셀렉터로는 HTML 태그(”[태그명]”), id(”#[id명]”), class(.클래스명) 세 가지가 주로 사용.
→ querySelector는 셀렉터를 조회한다는 의미를 가지고 있다. query의 의미는 질문하다라는 의미.
querySelector
querySelector에 ‘.tweet’을 첫 번째 인자로 넣으면, 클래스 이름이 tweet인 엘리먼트 중 첫 번째 엘리먼트를 조회
→ 한 개
1 | const [변수] = document.querySelector('.tweet') |
querySelectorAll
여러 개의 엘리먼트를 한 번에 가져오려면 querySelectorAll을 사용한다. 조회한 HTML 엘리먼트들은 배열처럼 for문을 사용할 수 있다. 근데 이제 배열은 아닌… 배열이 아닌 배열
→ 유사 배열, 배열형 객체 = Array-like Object
1 | const [변수] = document.querySelectorAll('.tweet') |
getElementById = querySelector
get으로 시작하는 DOM 조회 메소드는 querySelector와 비슷한 역할을 하는 오래된 방식이다.
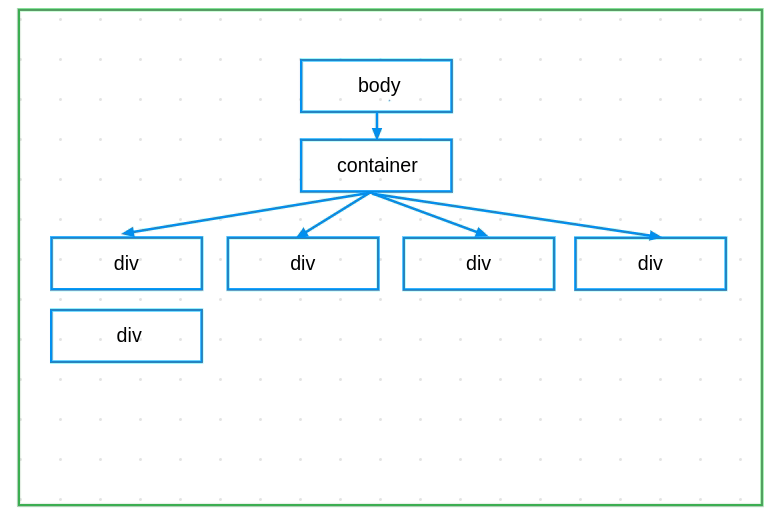
1 | const A = document.getElementById('container') |
⇒ 트리 구조에 새 엘리먼트 추가하기
1 | const container = document.querySelectory('#container') |
UPDATE - textContent, classList.add
UPDATE는 기존에 빈 div 태그를 업데이트한다. textContent를 사용하여 빈 div 엘리먼트에 문자열을 입력한다
1 | console.log(oneDiv) //<div></div> |
*class, id 외의 다른 attribute를 추가하기
⇒ MDN에서 setAttribute 메소드 검색
DELETE - remove, removeChild
CRUD의 Delete, 삭제하는 법.
remove 메소드 : 삭제할 엘리먼트 위치를 알고 있을 때
1 | const container = document.querySelector('#container') |
innerHTML : 여러 개의 자식 엘리먼트를 지울 때
1 | document.querySelector('#container').innerHTML = ''; |
→ innerHTML을 이용하면 간편하지만 보안 문제를 가지고 있어 다른 메소드를 사용함
removeChild : 자식 엘리먼트를 지정해서 삭제하는 메소드
1 | const container = document.querySelector('#container'); |
심화로 공부할 것.
- element / node 차이
- difference between element and node in javascript dom
- children / childNodes 차이
- difference between children and childNodes in javascript dom
- removeChild / remove 차이
- difference between removeChild and remove in javascript dom
- forEach는 되는데, reduce는 안되는 이유
- why array method is not working on nodelist
- 유사 배열에서 배열로 바꾸는 방법
- how to convert nodelist into javascript array